Let’s say we want to build a blog application that allows users to highlight text within articles and attach notes to those highlights.
The idea is that when a user selects some text, a dialog appears asking for a highlight color and a note. Later, when the user hovers over the highlighted text, the note is displayed.
Lets’s build this using Hotwire and StimulusJS! 🚀
Setting Up the Models
First, we’ll create an Article model with a title and body. The body will contain the text of the article, and we’ll store the highlights and notes separately in a Note model.
create_table "articles", force: :cascade do |t|
  t.string "title", null: false
  t.text "body", null: false
  t.datetime "created_at", null: false
  t.datetime "updated_at", null: false
end

create_table "notes", force: :cascade do |t|
  t.integer "article_id", null: false
  t.text "body"
  t.integer "start_offset"
  t.integer "end_offset"
  t.string "color"
  t.datetime "created_at", null: false
  t.datetime "updated_at", null: false
  t.index ["article_id"], name: "index_notes_on_article_id"
end
Selecting text
We’ll use StimulusJS to handle the text selection and display the note creation dialog.
Here’s what our article show page might look like:
<!-- app/views/articles/show.html.erb -->

<h1> <%= @article.title %></h1>

<time datetime="<%= @article.created_at.to_s %>">
  <%= @article.created_at.to_formatted_s(:long) %>
</time>

<p data-controller="notes"
   data-action="mouseup->notes#newNote"
   data-notes-article-value="<%= @article.id %>">
   <%= @article.body %>
</p>
As you can see, we’ve attached a Stimulus controller (notes) to the <p> element that contains the article body. We pass the article ID as a value so we can associate the note with the correct article, and bind an action to the mouseup event to open the dialog for creating a note.
The Stimulus controller is pretty straightforward. It has one public method — called when the user selects a piece of text — one private method to open the dialog, and a getter to calculate the selection’s start and end positions (more details on this at the end of the article).
// app/javascript/controller/notes_controller.js

import { Controller } from "@hotwired/stimulus"

export default class extends Controller {
  static values = { article: Number }

  // calculate text selection start and end positions
  // and open dialog to create a note
  newNote() {
    const offsets = this.#selectionOffsets;

    if (offsets) {
      this.#showNoteDialog(offsets.startOffset, offsets.endOffset);
    }
  }

  #showNoteDialog(startOffset, endOffset) {
    // we'll use turbo stream to open the note dialog
  }

  get #selectionOffsets() {
    // logic to calculate startOffset and endOffset
    // More details at the end of the article

    return {
      startOffset,
      endOffset
    }
  }
}
Opening a dialog and creating a note
To open the note dialog, we’ll use Hotwire’s Turbo Streams. When the user selects text, we’ll make a GET request to /notes/new, passing the article ID and selection offsets as parameters.
#showNoteDialog(startOffset, endOffset) {
  get(
    `/notes/new?article_id=${this.articleValue}&start_offset=${startOffset}&end_offset=${endOffset}`,
    { responseKind: "turbo-stream", }
  );
}
This function sends a GET request (I used request.js for this) and expects a Turbo Stream response to dynamically update the page with the note creation form.
Handling the note form and creation
Next, we need to add the new action to the NotesController, along with the corresponding Turbo Stream view:
# app/controllers/notes_controller.rb
def new
  @note = Note.new(
    params.permit(:article_id, :start_offset, :end_offset)
  )

  # it renders new.turbo_stream.erb
end
The Turbo Stream view (new.turbo_stream.erb) will append a dialog to the <body> tag containing a form to create a note. The article_id, start_offset, and end_offset are included as hidden fields, while the user is asked to choose a highlight color and enter the note’s text.
<!-- app/views/notes/new.turbo_stream.rb -->

<!-- append_all is needed here because we are using <body> instead of targetting an element by id -->
<%= turbo_stream.append_all "body" do %>
  <dialog open>
    <h3>Create note</h3>

    <%= form_with(model: @note) do |form| %>
      <%= form.hidden_field :article_id %>
      <%= form.hidden_field :start_offset %>
      <%= form.hidden_field :end_offset %>

      <%= form.label :color, "Select a color for the note" %>
      <%= form.color_field :color %>

      <%= form.label :body, "Add a note associated with the selected text" %>
      <%= form.textarea :body, rows: 4 %>

      <%= form.submit %>
      <%= button_tag "Cancel", formmethod: "dialog" %>
    <% end %>
  </dialog>
<% end %>
When the user submits the form, it’s sent to the create action in the NotesController. After the note is created, we’ll redirect the user back to the article.
def create
  @note = Note.new(note_params)

  if @note.save
    redirect_to @note.article
  else
    render :new, status: :unprocessable_entity
  end
end
Great! With this in place, users can now create notes with a color and start and end positions. But they still can’t see them. To fix that, we’ll need to update the article’s show page.
Highlighting text
We saved the note with its start and end positions, a color and the text. With that info, we could iterate through the notes and add the highlighting to the body of the article.
So far, we’ve been rendering the raw article body in a <p> tag. To support highlights, we need to inject tags into the text. The best option for this is the <mark> tag. For example, if the article says "This is the body of the article" and a user highlights "This is the body", we want to render:
<p><mark>This is the body</mark> of the article</p>To do this, we can use a helper method that wraps the selected portions of text with <mark> tags. Here’s what that helper might look like:
def highlighted_text(article)
    offset = 0
    text = article.body

    article.notes.sort_by(&:start_offset).each do |note|
      opening_tag = "<mark>"
      closing_tag = "</mark>"

      text = text.insert(note.start_offset + offset, opening_tag)
      offset += (opening_tag).length

      text = text.insert(note.end_offset + offset, closing_tag)
      offset += closing_tag.length
    end

    text
  end
We start with the article’s raw body and iterate over its notes, sorted by start_offset to ensure we apply highlights in the correct order. For each note, we insert an opening <mark> tag at the start position and a closing </mark> tag at the end position.
Since we’re modifying the string as we go, each insertion shifts the positions of the remaining characters. To account for this, we track the total number of characters we’ve added using the offset variable, and adjust the insertion positions accordingly.
We can now use this helper method in our view:
<!-- app/views/articles/show.html.erb -->

...

<p data-controller="notes"
   data-action="mouseup->notes#newNote"
   data-notes-article-value="<%= @article.id %>">
   <%= higlighted_text(@article) %>
</p>
Great! Now the text of the article is highlighted:
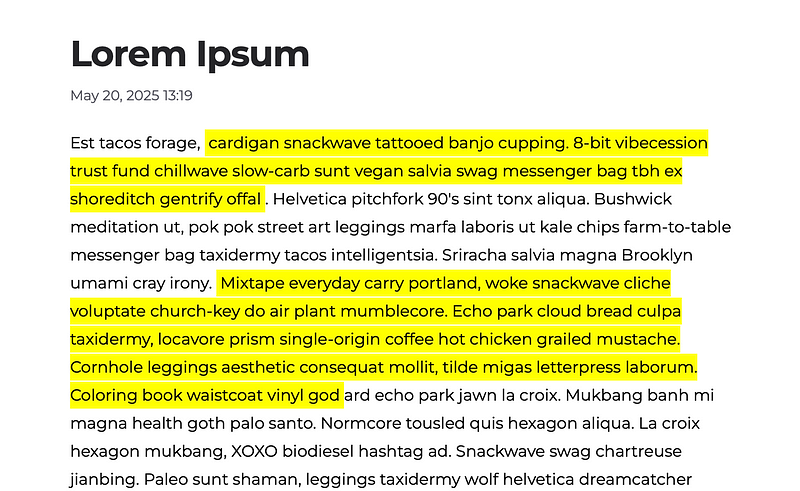
The next issue we need to address is that all notes are highlighted with the same color. To fix this, we can add an inline style attribute to each <mark> tag based on the note’s color:
def highlighted_text(article)
offset = 0
text = article.body
article.notes.sort_by(&:start_offset).each do |note|
opening_tag = "<mark style='background-color: #{note.color}'>"
...
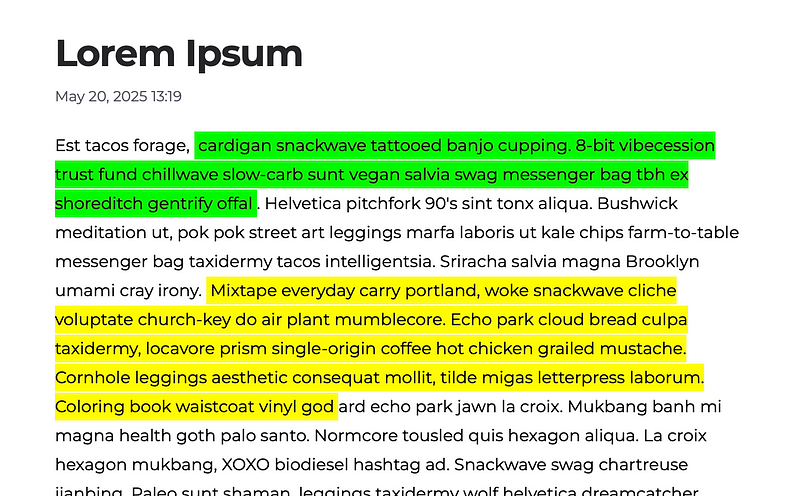
endNow our notes have different colors 🤩
Displaying the note on hover
Finally, we need to show the note when the user hovers over the highlighted text. To do this, we’ll use a hidden turbo-frame with lazy loading. When the user hovers over a highlighted text, we’ll reveal the frame so the note can be fetched and displayed. Pretty clever, right?
Let’s change the helper method to do that:
def highlighted_text(article)
  ...

  article.notes.sort_by(&:start_offset).each do |note|
    opening_tag = "<mark style='background-color: #{note.color}'>"

    # We add a turbo frame that gets the note show page
    note_frame = "<turbo-frame id='note_#{note.id}' src='#{note_path(note)} 'loading='lazy'></turbo-frame>"
    closing_tag = "</mark>"

    text = text.insert(note.start_offset + offset, opening_tag+note_frame)
    offset += (opening_tag+note_frame).length

    ...
end
The note show page should be wrapped on a turbo-frame with the same id used on the helper method:
<!-- app/views/notes/show.html.erb -->

<%= turbo_frame_tag @note do %>
  <h1>
    Note
    <!-- delete button -->
  </h1>

  <div> <%= simple_format @note.body %> </div>
<% end %>
To make all this work –hide the turbo frame until the user hovers over the parent mark tag– we need to add some css rules.
mark {
  position: relative;
  pointer: cursor;

  turbo-frame {
    position: absolute;
    left: 0;
    display: none;
    bottom: 50%;
  }

  &:hover {
    turbo-frame {
      display: block;
    }
  }
}
And this is the final result:

Appendix: how to calculate start and en positions
I promised I’d explain how the selectionOffsets function calculates the start and end positions of the selection. I ended up figuring it out with Claude’s help.
The solution is a bit tricky because the text we’re working with contains nested HTML tags—like <mark> tags inside the <p> element. These tags split the text into multiple text nodes, which makes the process more complicated.
get #selectionOffsets() {
    const element = this.element;
    const selection = window.getSelection();
    if (!selection.rangeCount) return null;

    const range = selection.getRangeAt(0);
    if (!element.contains(range.commonAncestorContainer)) return null;

    const walker = document.createTreeWalker(
      element,
      NodeFilter.SHOW_TEXT,
      null,
      false
    );

    const textNodes = [];
    let node;
    while (node = walker.nextNode()) {
      textNodes.push(node);
    }

    let position = 0;
    const nodeMap = new Map();

    for (const textNode of textNodes) {
      nodeMap.set(textNode, position);
      position += textNode.textContent.length;
    }

    const startOffset = nodeMap.get(range.startContainer) + range.startOffset;
    const endOffset = nodeMap.get(range.endContainer) + range.endOffset;

    return {
      startOffset,
      endOffset
    }
  }
The function walks through all the text nodes inside the element and calculates the exact start and end positions of the user’s selection relative to the entire text content — not just within a single node.
This way, even with nested tags, we can precisely identify which part of the text the user selected and save notes linked to that exact range.